Step 2: Develop Your First Widget
Great! You now have a working 1fe instance from Step 1. In this second step, you’ll dive into the development experience by creating and customizing widgets. This is where you’ll see the real power of 1fe’s development workflow.
What You’ll Learn
- How to explore and test existing widgets
- The widget development workflow and tooling
- Platform utilities and how widgets integrate with the shell
🔍 Explore the local 1fe instance
Test Sample plugins
-
Visit
http://localhost:3001/widget-starter-kit/utilsto view the example starter plugin -
Click the button
utils.context.get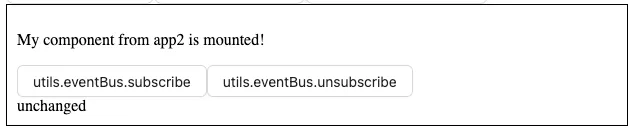
-
What just happened?
- 1fe loaded and rendered the plugin tied to the
/widget-starter-kitroute. - When
utils.context.getwas clicked, the plugin loaded a child widget via the magic of platform utilities! Platform utilities are built-in services for common tasks like context management, event communication, and storage. ✨ See what other utilities are in your toolkit.
- 1fe loaded and rendered the plugin tied to the
Read more about widgets and plugins and platform utilities.
🔧 Override widget starter kit with your local plugin
In the above section, we explored the example starter plugin. Let’s override that example plugin to use our plugin running locally.
-
If not already running, Run
yarn devin1fe-widget-starter-kit/Terminal window cd 1fe-widget-starter-kityarn dev1fe CLI will serve the widget bundle at
http://localhost:8080/js/1fe-bundle.js -
Visit
http://localhost:3001/widget-starter-kitand click the{...}button at the bottom right corner of the screen.
-
Search for
@1fe/widget-starter-kitwithin the shelf and select the matching module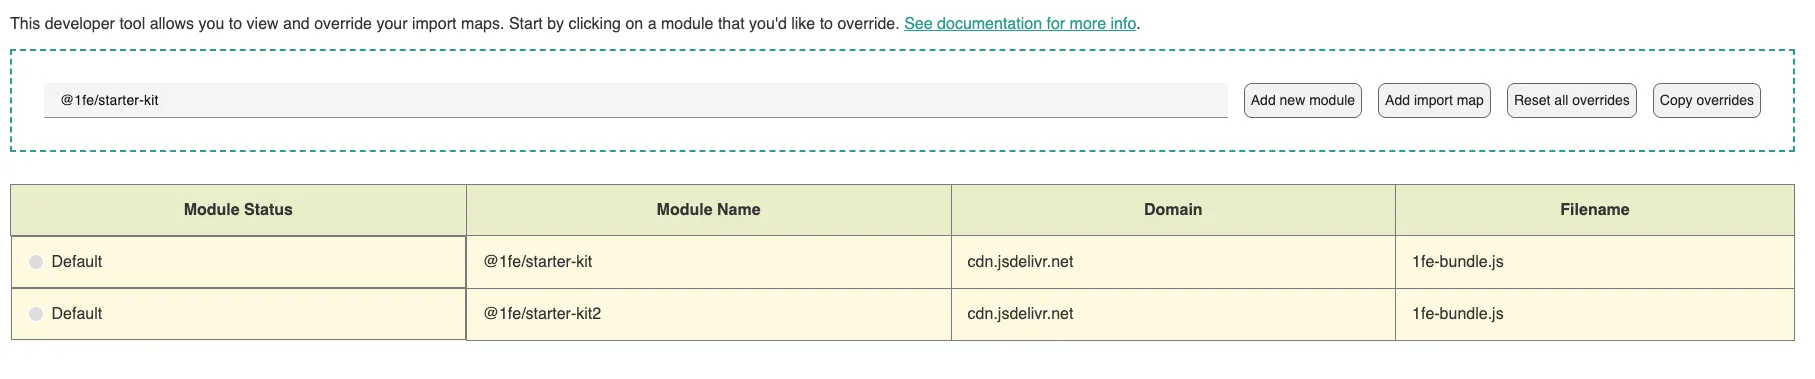
-
In the
Override URLfield, enterhttp://localhost:8080/js/1fe-bundle.jsand clickApply override.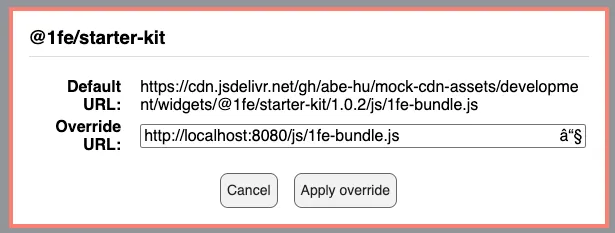
-
Make changes to your widget and observe the changes in the browser.
⚙️ Customize your 1fe instance
In the previous step, we overrode the example plugin to use our local plugin. Now let’s look at how to host your plugin locally so it shows up by deafult in the 1fe instance.
Build plugin assets
Setup widget-starter-kit
-
Make any content change to
1fe-widget-starter-kit/src1fe-widget-starter-kit/src/app1.tsx import { platformProps } from "@devhub/1fe-shell";import React, { useEffect } from "react";import { Router as Widget } from "./components/router";import { withProvider } from "./withProvider";import { WidgetProps } from "./contract";const RootWrapper: React.FC<WidgetProps> = (props) => {useEffect(() => {platformProps.utils.appLoadTime.end();console.log("Hello from app1!");}, []);return <Widget {...props} />;};export default withProvider(RootWrapper); -
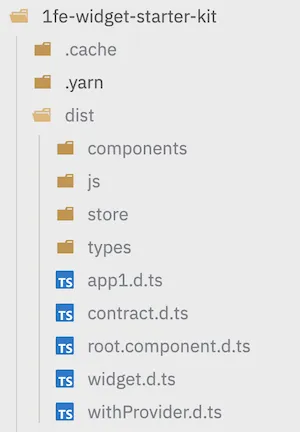
Build the plugin within
1fe-widget-starter-kitdirectoryTerminal window # 1fecd 1fe-widget-starter-kityarn build:widget
Setup the playground widget
We’ll also need the playground widget for our 1fe instance. The playground widget provides essential development tooling and runtime utilities.
-
Fork the 1fe-playground repository to your GitHub account.
Terminal window git clone https://github.com/<your-github-username>/1fe-playground.gitcd 1fe-playground -
Install dependencies and build the widget:
Terminal window yarn installyarn build:widget
Host the widgets locally
- Fork this mock-cdn-assets repository This repository contains the live configurations and widget assets per environment that power demo.1fe.com. We will use this as a jumping off point to get our own version of the assets
- Create a new directory within
integration/widgets/@1fe/widget-starter-kitof your forked cdn repo. The directory name should be the version from the package.json of the widget-starter-kit repository. (e.g1.0.2). - Upload the contents of the
1fe-widget-starter-kit/dist/directory to the new directory. - Create a new directory within
integration/widgets/@1fe/playgroundof your forked cdn repo. The directory name should be the version from the package.json of the playground repository (e.g1.0.50). - Upload the contents of the
1fe-playground/dist/directory to the playground directory. Following is an image which showcases what the directory structure will look like after you have moved the code over.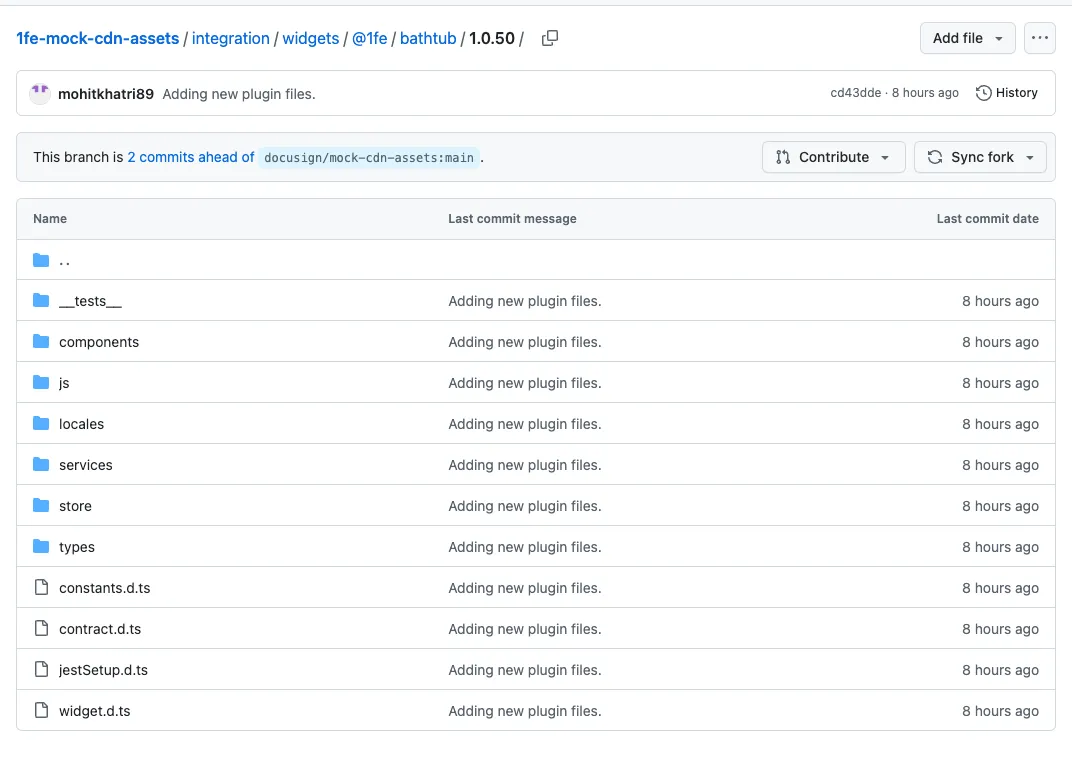
- Serve them locally using the serve package by running the following command
npx serve -C <root-of-cdn-assets-repo-locally>
Use the new widget assets in our 1fe instance
One of the key features of 1fe is the ability to dynamically load widgets and plugins via Live Configurations. We will now take advantage of these configurations to get our local 1fe instance to get the config’s from our local CDN.
Update widget-versions.json
The widget-versions.json file defines the available versions for each widget that can be loaded by the 1fe platform. Create integration/configs/widget-versions.json file within your forked mock-cdn-assets repository and update it like so:
[ { "widgetId": "@1fe/playground", "version": "<version of the bundle we moved to mock-cdn-assets>" }, { "widgetId": "@1fe/widget-starter-kit", "version": "<version of the bundle we moved to mock-cdn-assets>" }]Update live.json
The live.json file contains the runtime configuration for the plugins that are being loaded
-
Locate
integration/configs/live.jsonwithin your forked mock-cdn-assets repository and make the following changes: -
Update the basePrefix to point to your server running locally through the serve package
-
Remove the
sample-widgetandsample-widget-with-authwidget configurations as they are not needed for this example. Following is what the diff will look like. Also, here is a PR showcasing these changeslive.json {"libraries": {"basePrefix": "http://localhost:3000/integration/libs/"},"widgets": {"basePrefix": "http://localhost:3000/integration/widgets/","configs": [{"widgetId": "@1fe/playground","plugin": {"enabled": true,"route": "/widget-starter-kit"}},{"widgetId": "@1fe/sample-widget","plugin": {"enabled": true,"route": "/sample-widget"}},{"widgetId": "@1fe/sample-widget-with-auth","plugin": {"enabled": true,"route": "/sample-widget-with-auth","auth": {"authenticationType": "required"}}}]}} -
Confirm that the updated Live Configurations are working by visiting the following link:
http://localhost:3000/integration/configs/live.json
Point your local 1fe instance to the new CDN assets
To point the 1fe instance to the new CDN assets, update the src/config/ecosystem-configs.ts file with the following changes:
// ...export const configManagement: OneFEConfigManagement = { widgetVersions: { url: `http://localhost:3000/integration/configs/widget-versions.json`, }, libraryVersions: { url: `http://localhost:3000/integration/configs/lib-versions.json`, }, dynamicConfigs: { url: `http://localhost:3000/integration/configs/live.json`, }, refreshMs: 30 * 1000,};Navigate to starter kit locally and check the console for the message “Hello from app1!” to confirm that your changes are being reflected.
Tada!

🎉 You have a local 1fe instance!
You’ve successfully set up local development for your 1fe widgets! You can move on to the next section if you want to deploy your 1fe instance quickly to showcase it’s benefits to your team. Or, you can use the below links to jump to different sections to learn more.
🎯 What You’ve Accomplished
- ✅ Explored the widget development workflow using the playground
- ✅ Learned about platform utilities and how widgets integrate with the shell
- ✅ Understood the development tools and local development process
- ✅ Built hands-on experience with widget creation and testing
👉 Next Step
Now that you understand how to develop widgets locally, it’s time to take your proof of concept to production and show stakeholders a complete deployment.
→ Step 3: Deploy Your Proof of Concept
In the final step, you’ll deploy your instance to a production environment.